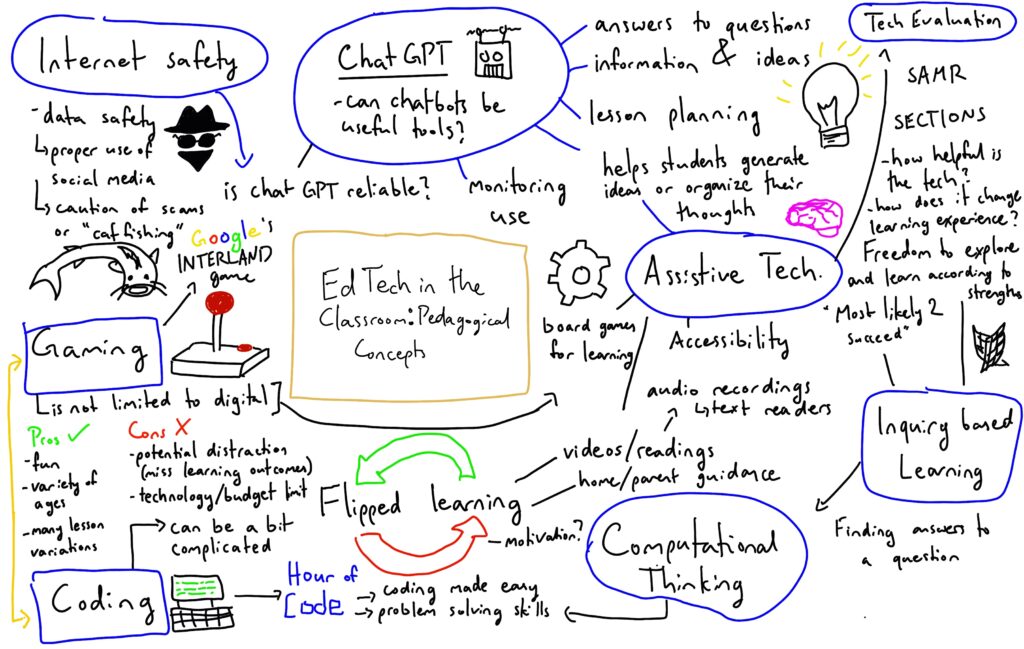
Final Sketchnote

A Technology Innovation Journal

During our education and technology class, we explored how teachers can implement technology in their classrooms in an effective, engaging, and safe way, for all levels and learners. For our inquiry project, we asked: How can Minecraft be effectively used in the K-12 learning experience?
After investigating this question, we concluded that Minecraft can be used effectively in the classroom to teach students K-12.
The best way to do this is through a program called Minecraft Education. This is a free and safe program designed for teachers and students to use. It includes predesigned lessons that align with the BC curriculum including curricular competencies and learning outcomes. These lessons can be completed online independently or in a group. On Minecraft Education, teachers can find tutorials, activities, and assessment tools. This allows Minecraft Education to be easily adapted and modified to fit the needs of the students in a way that challenges and supports them. Even though we believe this program is a wonderful resource for teachers, we learned that there are pros, cons, and risks to take into consideration.
Pros:
Cons:
Risks:
Implementing Minecraft Education:
When implementing Minecraft Education, teachers should first double-check with admin and the tech team to make sure that this program is allowed in their school. Secondly, teachers should also send a letter home to communicate to the families that students will be participating in this learning style. The teachers can list the pros, cons, and risks, and also mention the safety precautions that will be taking place. Lastly, the teacher should also check in with students and see how they feel about Minecraft Education. This style of learning may not be preferred by some students. Be sure to consider students’ feedback and change your lessons accordingly.
After investigating our inquiry question “How can Minecraft be effectively used in the K-12 learning experience?”, we learned that teachers can effectively teach through Minecraft Education. It can promote a creative, safe, and inquiry-based learning space for students to learn independently and/or collaboratively. Minecraft Education provides tutorials, lesson plans, and assessment strategies for teachers. There are pros, cons, and risks to this program, so teachers should think critically about using this technology in their classrooms. Our group had a lot of fun exploring this topic and we all think that we could use Minecraft Education effectively in our teaching.
Here is the link to our Canva presentation.
References:
How Can Minecraft Be Used As an Educational Tool? (2021, June 2). Engineering for Kids. Retrieved March 21, 2023, from https://www.engineeringforkids.com/about/news/2021/june/how-can-minecraft-be-used-as-an-educational-tool/
(n.d.). Minecraft Education: Minecraft Official Site. Retrieved April 4, 2023, from https://education.minecraft.net/en-us
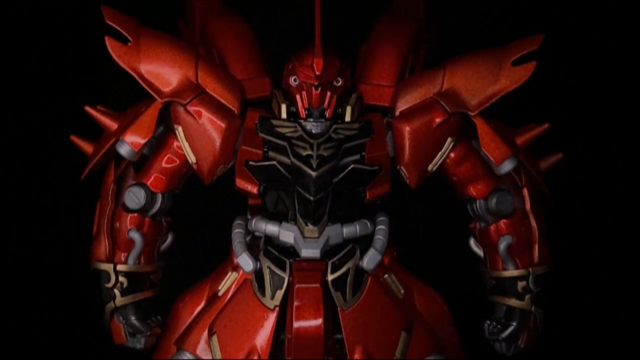
And here it is; finally finished in all of its glory. The 1/144 scale MSN-06S Sinanju. 40+ hours of work and I couldn’t have asked for a better result. I’m sad to say that this journey has come to an end, but I’m overwhelmed with joy that the build project is finally finished.
Reflecting on this whole process, I can confidently say that I thoroughly enjoyed it and would definitely do it again. Learning how to use various technological tools and getting to document my work using them was such a fun experience (and has actually made me consider a career in content making!). The whole process from start to finish was such a rollercoaster and I had to overcome many barriers along the way.
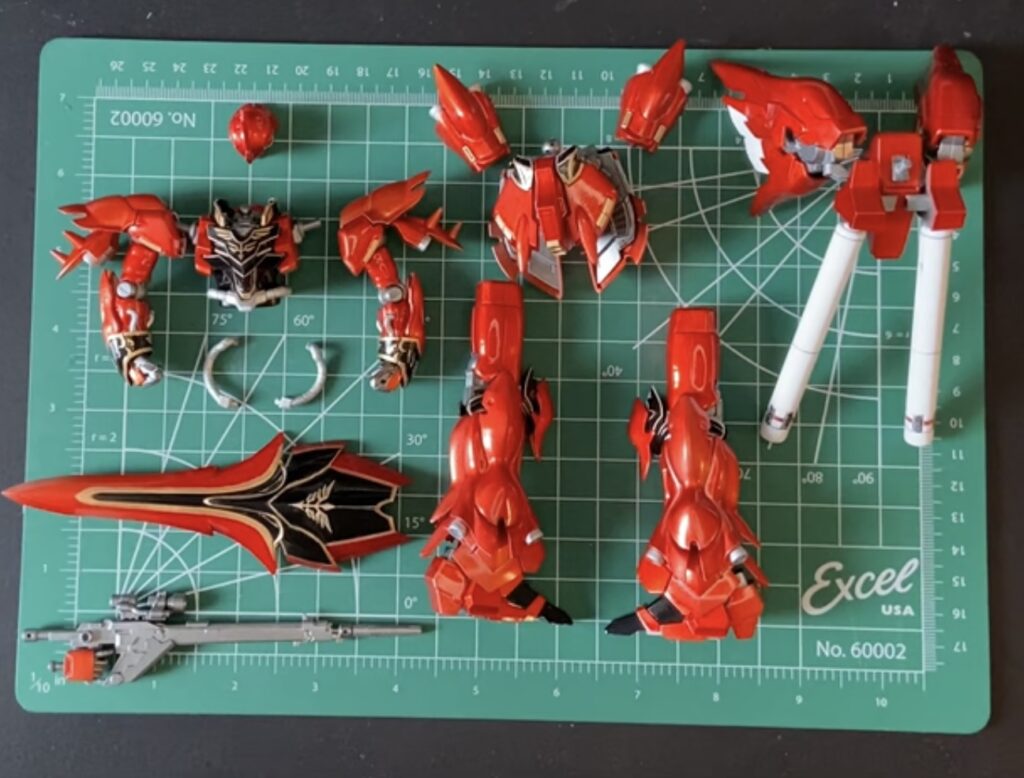
First I was running out of air for the airbrush, then I was having issues with my paint ratios, and on top of that, I let the enamel paint cure for too long, which in-turn affected my gold parts. But amongst all that, I ended up with a premium model kit that definitely doesn’t look like it was a chunk of plastic that was bought for $40. Like I said, I do plan to do more projects like these in the future, and considering what I have learned now, I would make a few adjustments. I would probably use the Mr. Hobby aerosol primer instead of loading it up into the airbrush (you can see why I made that switch in last week’s post). Another thing I learned was that if I let my enamel coat sit for too long, I can actually end up rubbing off the gold underneath it as well when I remove it. It’s not that noticeable on my kit, but you can see the spots where that happened.

Overall, the entire journey was a blast. I’m glad you all got to join me on this project, and I’m looking forward to sharing many more. Below is a short video recapping the whole project from start to finish (stay to the end for a cool edit). And that wraps up my EdTech Free Inquiry Project! Until next time my friends!
Hi everyone and welcome back to the Free Inquiry Log! I can’t believe we’re almost at the end of this journey. This week, I had a lot to cover after a few minor setbacks.
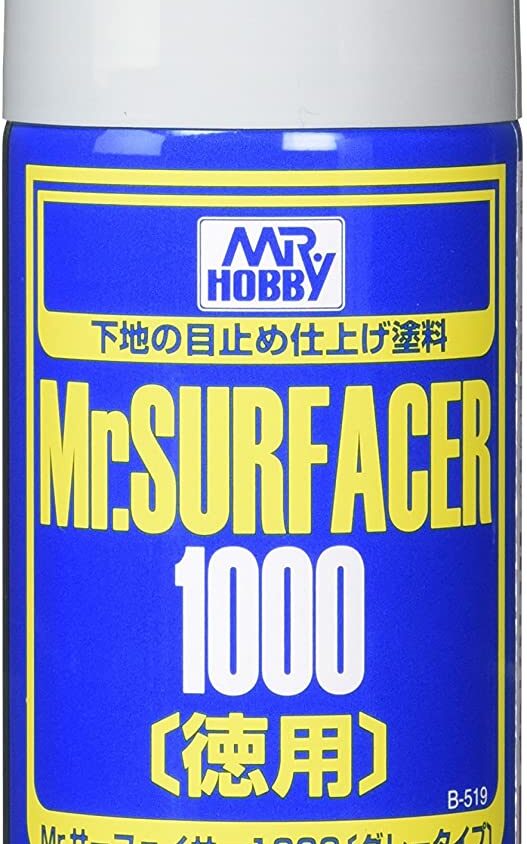
I realized a little while that halfway through painting the red parts, I wouldn’t have enough air to finish airbrushing the rest of the project. To help myself conserve resources, I switched my primer from using Tamiya’s airbrush surface primer to Mr. Hobby’s Mr. Surfacer Primer from an aerosol can. I actually found myself to prefer this method better because the primer already comes pre-mixed, so I don’t need to fiddle with correctly ratioing the primer to thinner. It was also a lot more efficient.

Eventually, I was able to get additional compressed air to continue my project, but now it was crunch time. I started with painting all of the parts with the gold detailing their base gold colour. Once that coat was dry, I applied the gloss black enamel paint. My first coat was a little bit too liquid for my intended purpose. I had mixed too much thinner with the enamel, so the paint became very diluted and did not apply in the way I wanted. It did, however, create a cool, weathered gold effect on my parts, but again, that was not the look that I was goin for. I let the first coat dry, then re-mixed my paint ratio and re-applied the gloss black. This time I did get the desired look and then began the reverse wash after that coat had dried.
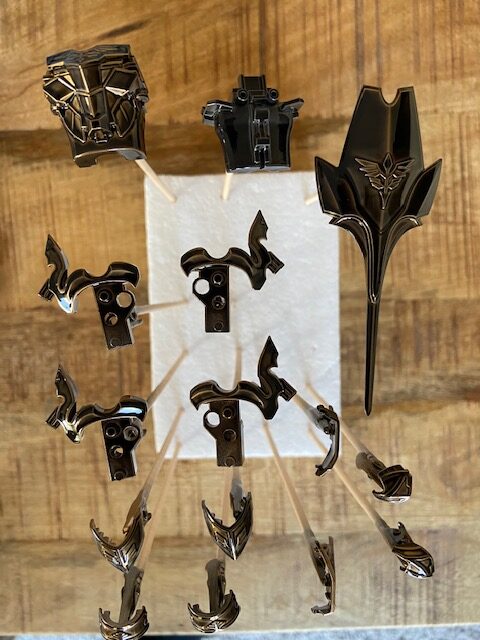
For this process, I took some hobby Q-tips and dipped them in a little bit of enamel thinner. I then slowly rubbed away the black on the areas where the gold detail will shine through. This part was extremely satisfying as it gave a certain high-quality look to my parts that there was no way I would have achieved with stickers. I mean, look how clean the Zeon crest looks in the video!
Once that was done, I simply airbrushed the rest of the inner frame parts in the gunmetal grey and the verniers in a flat aluminum. And with that, it’s time! All parts have been completed and are ready for assembly! I can’t wait to finally show you all what these processes will lead up to and what the final product will look like. That’s all for now and I will see you all next week for the final chapter in this project!
Hi everyone and welcome back to the Free Inquiry Log! In our most recent update, we’ve added colour! This step was super exciting as I finally got to see some noticeable progress on the project. Here is a short video that breaks down the process.
I once again used the airbrush to apply the paints. According to my plan, I first applied a coat of metallic silver to my primed parts. This process was a little bit difficult as the difference between the primer and the metallic silver paint was very subtle, so it was hard to tell if I was getting proper coverage as I was painting. You’ll see in the image below what the metallic paint (right) looks like compared to a part with just primer (left).
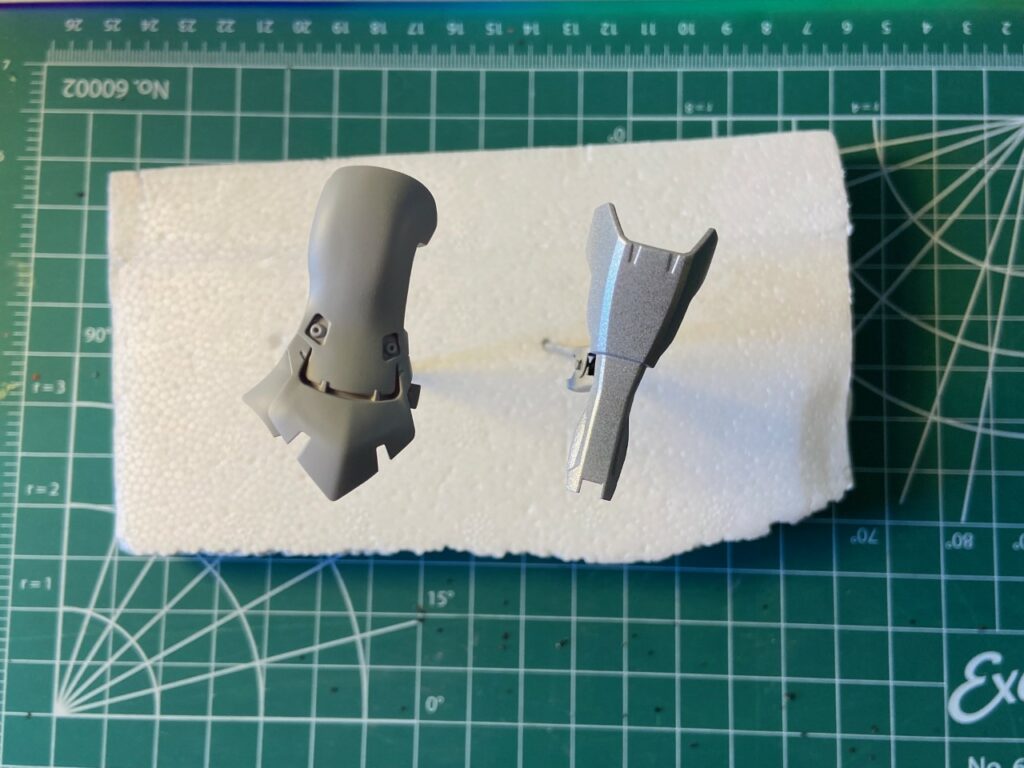
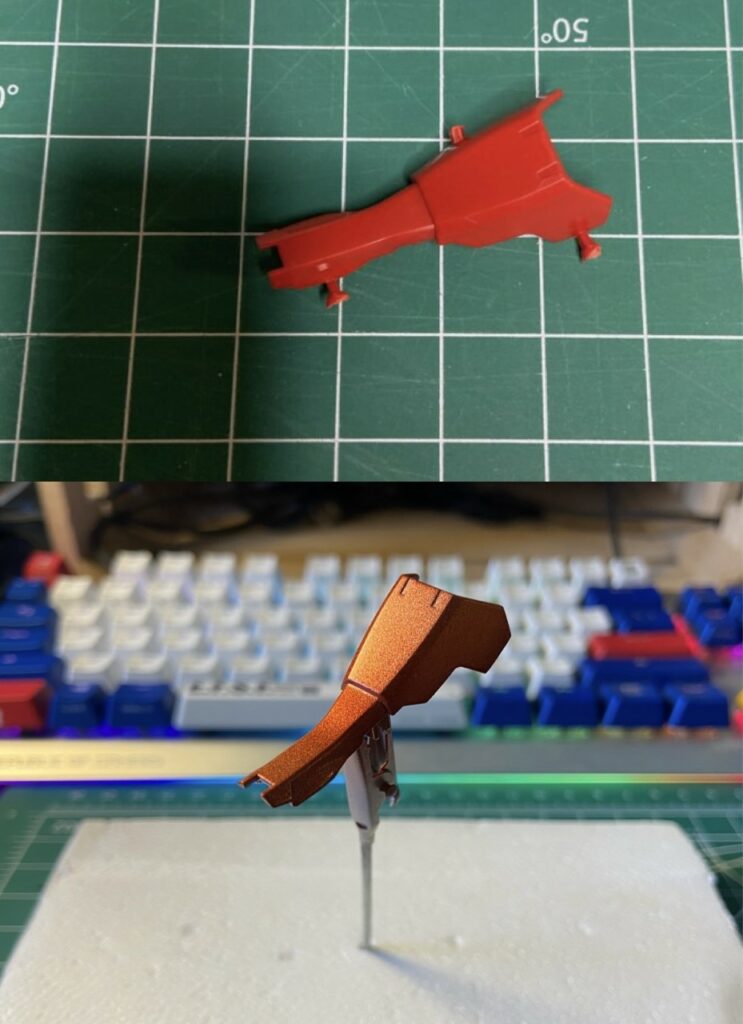
As you’ll see, one of them has a little bit more luster to it, but the difference is still subtle. But that’s what is going to give them the shiny look once I’m all finished. Now that the parts had been given their chrome undercoat, it was time to add their colour. Since I wanted the shininess of the silver to come through, I used a clear red paint with the airbrush. The paint acted more like a stain and was easier to see how well I was covering each part. Below you can see a comparison of the same part just snapped out of the box versus after I had fully painted it.
That wraps it up for this week, and I’m looking forward to showing one of the final steps before assembly, which is the reverse wash technique for the gold detailing! See you all then!
When I first thought of what gaming in education looks like, I immediately thought of video games. But one thing I overlooked is that gaming can include physical and board games as well. For our class today, we looked at how different types of games can be effective tools for teaching in the classroom and also what cautions we should consider when using them.
First of all, what makes a game good for education? To identify that, we needed to categorize different types of educational games. They can be divided into 4 categories of gamified learning, single-player digital games, multiplayer games, and active versus immersive games. Gamified learning include activities such as Duolingo, where at its core, you are still simply doing learning exercises but just using fun and colourful ways to track your progress. Simply put, there is not much “gameplay.” I think that these types of learning games are effective in teaching, but engagement levels can rapidly drop due to the repetitiveness of the activity,
I think that for learning games to be effective, there has to be an engaging gameplay factor that challenges players; a task that focuses more on the “play” rather than the learning. What I mean by that is not to completely disregard or exclude any learning elements, but rather let students learn through their play. In my own experience, I’ve learned a great deal through gaming where learning was not even the intent of the game. But the game included subtleties and lessons that I got to experience simply through playing. For example, the Interland game that we played in class today had fun and engaging gameplay, but it contained lessons and concepts about internet safety that were sprinkled throughout. I think that games like this are especially great tools for teaching because it keeps the childrens’ attention.
Now, how would we ensure that students are not just playing for fun and actually taking away information from their gaming experience? Teachers could include a follow-up assessment to make sure that their students are absorbing all of the key takeaways from the game. This could be something as simple as a worksheet or study guide that will help students retain the knowledge that the game helped them to learn.
Of course, gaming is not always accessible because technological or budget constraints exist. But Whenever possible, I believe that teachers can use gaming as a great way to teach fun lessons to their students, while having a little bit of fun themselves.
Hey everyone and welcome back to the Free Inquiry Log! Progress on my project has been going a little bit slower than expected, but I’m happy to finally be getting painting this time! So, as the title gives away, this post will be focusing on applying the paint primer to all of my parts.
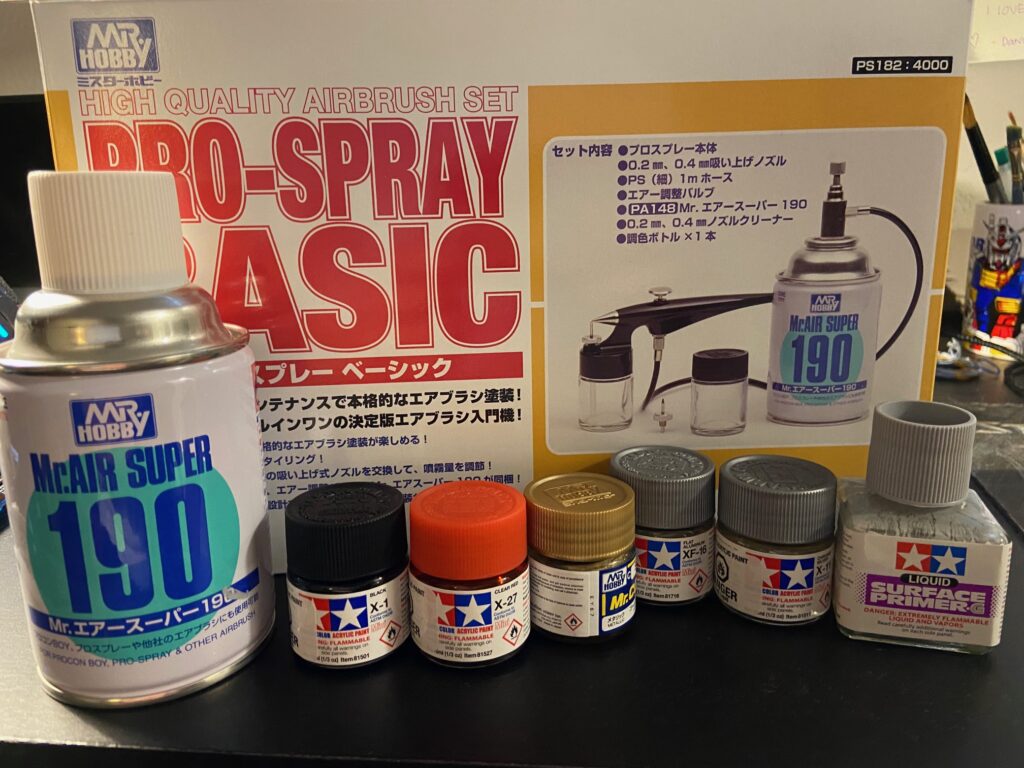
Below here is a picture of my airbrush and paint setup. The airbrush I will be using is the Mr. Hobby brand Pro-Spray Basic that functions using a can of compressed air. Along side it I have my primer, which is Tamiya’s grey surface primer, and my various acrylic and enamel based paints. Today, we’ll be focusing mostly on using the primer.
When using these types of paints with the airbrush, it is important that the consistency of the paint is correct so that it sprays through the airbrush properly. That is why I have to use the lacquer thinner with the primer. I mixed the two together with a ratio of primer to thinner of about 1:2. The trick is to get your paint to be the consistency of milk. Once that was all set up, I could attach the hose from my airbrush to the can and spray away. Here is a video of the process (including the sanding from last week).
As seen in the video, I sprayed in short bursts rather than a continuous stream. It’s really important that I apply the first coat in thin layers as I do not want the paint to “goop” up on my parts. Besides, I can always apply a second coat should my parts need more primer afterwards. Now that my parts are primed, I can finally start adding colour! That’s all for this post and I can’t wait to share what is next to come!
Our class had a great opportunity today to listen to a presentation from Jesse Miller about safe technology use and social media. The topic of technology use and social media has grown exponentially in recent years as technological advances continue to grow. With an increase of conversations around this topic, so comes an increase in the controversy surrounding it. To put it simply, we can ask ourselves the question: Is social media and technology bad or good? The short answer is that it depends, so let’s take a closer look at both sides of the argument.
Miller’s presentation gave a great outline of the dangers of using social media. I definitely agree with him that people need to be weary of what they post online. Whatever we post on the internet creates our digital footprint that can be accessed by virtually anyone. He provided examples of employees running the risk of losing jobs because of irresponsible internet behaviour. I think that these are all valid points, and that the internet and technology can be a dangerous liability if not used correctly. I also feel like it does take away from some of the other joys of life, such as playing outside and enjoying nature. I often talk with my peers about how when we were children, we would be biking to each other’s houses or running around the neighborhood being active. Now I see many kids at that age in front of iPads, smartphones and computer screens.
But even though there are a lot of things to be careful around when using technology, I can agree with Miller that it is something that has greatly benefitted the way we live our lives. Many utilities have been condensed into a single, palm-sized device with abilities to make phone calls, keep time, send instant messages, conduct internet searches, and much more. Technology also provides us with platforms to share our works and instantly connect with one another. It offers the convenience that we just didn’t used to have.
Now, where it gets tricky is who should be using technology and social media. I definitely do not think that it is for everyone, at least some aspects of it. There is a reason age restrictions on apps and websites exist, but children can easily lie about their age and gain access to platforms that they probably shouldn’t be using. This can lead to them becoming vulnerable on the internet, and we’ve already heard so many stories of children developing internet “relationships” that quickly spiral into much more grave issues. I think as educators it is our responsibility to guide students and youths on how to safely navigate their time on the internet.
Personally, I believe smartphones should not be given to children under a certain age, but that is something I do not control; their parents do. Something I can do, however is teach them how to smartly use their devices and help them move away from that addiction. I really liked the 20-20-20 rule that Miller talked about in his presentation, and it might be something that I will consider using in my future classroom. This model uses 20 minutes of education with short 3 or 4 minute breaks in between for students to have free time to go on their devices if they wish. This can act as a collective class privilege that can be effective in deterring students from using their phones during class time.
So, at the end of the day, I wouldn’t say I am either for or against technology, but I can definitely say that I want to make it my goal to ensure that the people around me know of all of its great possibilities and dangers.
When people hear the word coding, they usually think of the guy that’s sitting behind the computer screen typing in letters and numbers that look like the matrix. But what is coding actually? In our class this week, we looked at coding from an educational standpoint and what it could look like within the classroom.
Simply put, writing code is essentially creating the input commands that will run a program, be it a short animation, video game, or other form of media. In our class we looked at block coding, which is a simplified version in which we did not need to type out any script. I decided to try my hand at block coding using a Minecraft Underwater Adventure from the website Hour of Code. With block coding, pre-written commands are packaged into different blocks that are labelled with different functions, for example, the one I did had blocks that made the sprite (character on screen) move and perform specific actions. The blocks can be dragged and put into an order and the sprite will carry out those commands in that order. Sometimes there were modifiers that made the character repeat tasks or change their actions if certain conditions were met. Overall, it was pretty simple to follow and I felt pretty proud of the work I did which can be seen in the video below. I even got a certificate once I completed the project!
Now, how useful will this be in the classroom? That depends. The program I was using was very simple to use and understand, but I would not recommend coding exercises for students under the grade 2 level as coding requires a lot of patience. Secondly, the technology that is available can be limiting to the possibilities of including coding activities in the classroom. But let’s say that all the conditions are met. I think that coding can be a useful and engaging educational tool in the classroom. Introducing it to young children might spark some passions in them or even just give them a better understanding of how the games they play function. Coding can also be cross curricular in a way that students can create stories, art pieces and even do puzzle problem solving. I see it as a valuable tool that can be used, and the best part is that it’s free!
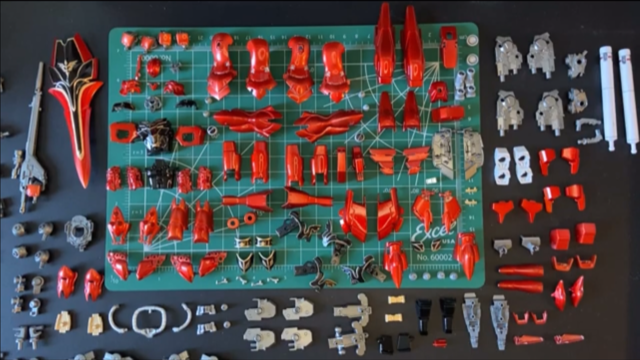
Hey everyone and welcome back to the Gundam build log! This time, I will be finishing up all of the preparation of the parts, so that means we will finally get to see some painting next post! Last week, I was just cutting out all of the parts and removing the extra nubs. For this post, we will look at how to sand the pieces and wash them so that they are ready for the paint primer.
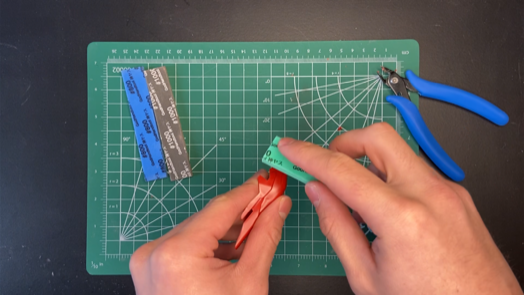
In the above image, you can see me sanding one of the parts. Normally, I wouldn’t do this as sanding can take away the natural gloss of the plastic, but since I am painting, this will not matter. It is also better to sand parts when painting so that they are as smooth as possible for a nicer looking finish. To do this, I use 600, 800, and 1000 grit sanding sponges (as seen in the photo).
Once all of the parts have been sanded, there is one final step to prepare them for paint: giving them a wash with soap and water. The reason it is recommended to do this when painting gunpla is because out of the factory, the parts have industrial oils that would affect how the paint goes onto the parts. If I was just straight building the kit however, I wouldn’t need to wash.
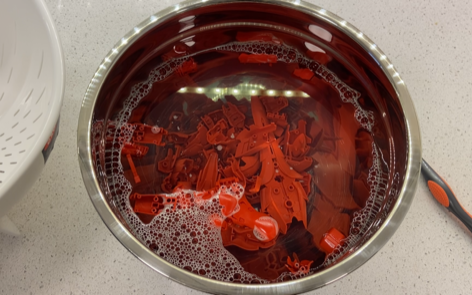
I let the parts soak in warm, dish soap water for about 30 minutes here and then scrubbed them with a toothbrush before giving them a rinse. I only did the red ones for now because those are going to be painted first. One thing that is really important though is that natural body oils can still affect the parts, so it is recommended that I wear gloves when handling them from now on.
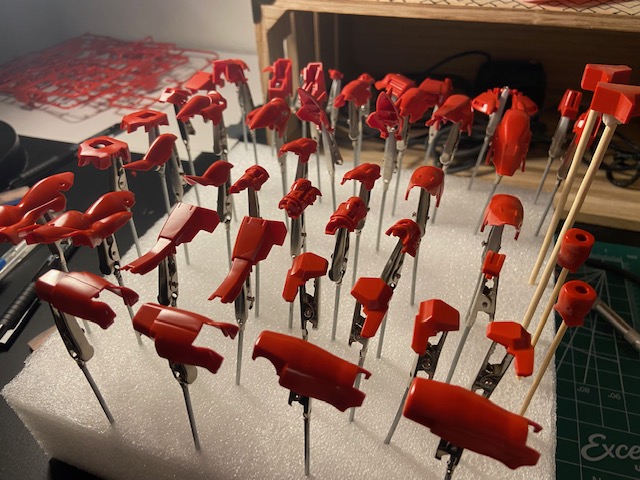
The next thing I did was put all of the parts on these gator clips that you’ll see below. Now they are all ready to get that first coat of paint!
That’s all for this week, and I will see you guys next time!